

When we use Power Apps Grid customizer control, there could be cases when the rendering depends on the other cells. We cannot control when the cell rendering happens, and the Power Apps Grid doesn’t always rerender the cells when the data wasn’t changed (or doesn’t provide the updated data). In this blog I’m talking about how to work arround this issue, and create your own events for cell renderer.
The use case
This blog applies to all dependency cases, but it’s easier to explain looking to a specific use-case. Do you remember the example from the docs, which shows the CreditLimit in red or blue, depending on the amount value?

Now let’s create a similar control, where the colors depend on another cell. Let’s consider a table “Consumption“. The “Amount” column should be shown in different colors, depending on a column “Plan” (of type Choice/OptionSet). An example:
- For “Plan A”, it should turn orange, when the “Amount” is over 10.000. (otherwise green)
- For “Plan B” it should turn red when the Amount is over 100.000 (it’s a more expensive plan)
- For “Plan C” it should turn “darkred” when the Amount is over 500.000

Or if you prefer the definition as code:
const rules = {
    //Plan A
    "341560000" : (value: number) => value > 10000 ? "orange" : "green",
    //Plan B
    "341560001" : (value: number) => value > 100000 ? "red" : "green",
   //Plan C
    "341560001" : (value: number) => value > 500000 ? "darkred" : "green
}
The problem
The code is pretty simple, and similar with the example from the docs (which can be found here). I just have to check the plan code first. Here is my code:
 {
  ["Integer"]: (props: CellRendererProps, rendererParams: GetRendererParams) => {
      const {columnIndex, colDefs, rowData } = rendererParams;
      const columnName = colDefs[columnIndex].name;
      if(columnName==="diana_amount") {
          const plan = (rowData as any)["diana_plan"] as string;
          //console.log(plan);
          const value = props.value as number;
          const color = (rules as any)[plan](value);
          return <Label style={{color}}>{props.formattedValue}</Label>
          }
     }
 }
And it seems to work, until we edit the “Plan” value. The problem: after changing the plan, then “Amount” will be re-rendered, but the data we get as a parameter contains (sometimes) the old value for the “plan”. And there is no other event to force the re-rendering. Have a look:
I’m not sure if it’s a bug, or not. It’s an edge case, since we need to refresh another cell, not the one being edited.
The solution
We could try to force a refresh, by changing the control in edit mode, and then back (stopEditing). That could force a refresh, but it would cause a flickering on the screen, and that’s not nice.
I went with another approach: trigger an own event. And here is how I’ve implemented it.
The complete code can be found in my github repository: https://github.com/brasov2de/GridCustomizerControl/tree/main/CellDependency
EventManager
First I’ve created an EventManager, a class which can trigger events and let the cells to attach to them. It’s easy to create; based on the CustomEvent API
export class EventManager{
    private target : EventTarget;
    private eventName: string;

    constructor(eventName: string){
       //didn't wanted to attach to a real DOM element, so I've created an own target
        this.target = new EventTarget();
        this.eventName = eventName;
    }

    public publish(rowId: string, value: any | null ){
        //trigger an event, passing the rowId and value to the listeners
        this.target.dispatchEvent(new CustomEvent(this.eventName, {detail: {rowId, value } }));
    }

    public subscribe(callback: any){
        this.target.addEventListener(this.eventName, callback);
    }
    public unsubscribe(callback : any){
        this.target.removeEventListener(this.eventName, callback);
    }
}
I think is self explaining. The publish method will be called when the “plan” was changed. The subscribe and unsubscribe is supposed to be called inside the react component rendering the coloured labels.
This eventManager class instance is created inside my cellRenderer closure:
export const generateCellRendererOverrides = () => {

    const eventManager = new EventManager("OnPlanChange");

    return  {
        ["Integer"]: (props: CellRendererProps, rendererParams: GetRendererParams) => {
           //code for "Amount" renderer goes here
        },
        ["OptionSet"]: (props: CellRendererProps, rendererParams: GetRendererParams) => {
            //code to check if the "plan" value was changed
            //return null, so let the grid create the control for you
             return null;
        }

    }
}
React component for rendering the dependent cells – event listener
const Amount: React.FC<IAmountProps> =
({ value, plan, rowId , formattedValue, eventManager}: IAmountProps) => {
   //keep the plan (dependency) in an internal state
    const [currentPlan, setCurrentPlan] = React.useState(plan);

    //this part takes care to detect when the cell was unloaded by the grid
    const mounted = React.useRef(false);
    React.useEffect(() => {
        mounted.current = true;
        return () => {
            mounted.current = false;
        };
    }, []);

    //this callback is responsible to change the "currentPlan" state;
   //that way React rerenders the label
    const onChanged = (evt: any) => {
        const detail = evt.detail;
        if(!mounted.current) return;
        if(detail.rowId === rowId){ //ignore the events for the other cells
            setCurrentPlan(detail.value);
        }
    };

   // the magic happens here:
   //when the component is created, subscribes to the eventManager
   //the return at the end of effect takes care to unsubscribe this component from the eventManager
    React.useEffect( () => {
        if(!mounted.current){
            return;
        }
        eventManager.subscribe(onChanged);
        return () => { eventManager.unsubscribe(onChanged);}
    }, [rowId]);

    const colorFn = currentPlan ? rules.get(currentPlan) : undefined;
    return <Label style={{color: colorFn ? colorFn(value) : "black"}}>{formattedValue}</Label>
};

export default Amount;
To say it in a few words: we keep the dependency in an internal state, and use the “React.useEffect” to attach when the component is created/unloaded. There we subscribe to the eventManager, and get notified when there was a change. The callback attached will set the state “currentPlan”, and React will rerender the cell. All cells from all rows are listening to the event, so we filter only the events for the current rowId .
The cell renderer looks now like this:
export const generateCellRendererOverrides = () => {
    const eventManager = new EventManager("OnPlanChange");

    return  {
        ["Integer"]: (props: CellRendererProps, rendererParams: GetRendererParams) => {
            const {columnIndex, colDefs, rowData } = rendererParams;
            const columnName = colDefs[columnIndex].name;
            if(columnName==="diana_amount") {
                const plan = (rowData as any)["diana_plan"] as string;
                return <Amount
                           value={props.value as number | null}
                           plan={plan}
                           eventManager={eventManager}
                           rowId={rowData?.[RECID] as string}
                           formattedValue={props.formattedValue}/>;
            }
        },
        ["OptionSet"]: (props: CellRendererProps, rendererParams: GetRendererParams) => {
         //code goes here
            return null;
        }

    }
}
Triggering the event
There could be 2 cases to trigger the event, depending if the dependency cell has it’s own renderer or not:
- In case you have implemented your own cell renderer, you know when the value was changed, so you could trigger there the eventManager.publish() method
- You don’t need to implement your own cell renderer for the cell you depend on
The case 1 is not very common, and means only calling the publish method, so I won’t go with that one. I’ll go with the case 2. The problem here is to detect that the value was changed. So I’ve implemented an own cache, where I track the last “plan” value per row (using a Map). Where a change is detected, we just call the eventManager.publish.
We just return null at the end of the render function. That way the the Power Apps Grid will use the standard controls.
export const generateCellRendererOverrides = () => {

    const eventManager = new EventManager("OnPlanChange");
    //we create a cache containing the combination: rowId->planValue
    const planCache = new Map<string, string | null >();

    return  {
        ["Integer"]: (props: CellRendererProps, rendererParams: GetRendererParams) => {
           //we saw that above
        },
        ["OptionSet"]: (props: CellRendererProps, rendererParams: GetRendererParams) => {
            const {columnIndex, colDefs, rowData } = rendererParams;
            const columnName = colDefs[columnIndex].name;
            if(columnName!=="diana_plan") return;
            const rowId = rowData?.[RECID];
            if(rowId===undefined) return;

            const oldValue = planCache.get(rowId);
            if(oldValue!=null && oldValue !== props.value){
                //when there is a change, we trigger the event
                eventManager.publish(rowId, props.value);
            }
            planCache.set(rowId, props.value as string ?? null);
             //return null will use the standard component for Choices/OptionSet
            return null;
        }

    }
}
That’s it. Now the color of the amount is changed right away.

Another use-case
Remember my older blog about calculated cells using Power Apps Grid customizer control: https://dianabirkelbach.wordpress.com/2022/09/19/implement-calculated-columns-with-power-apps-grid-control/ (s. screenshot below).
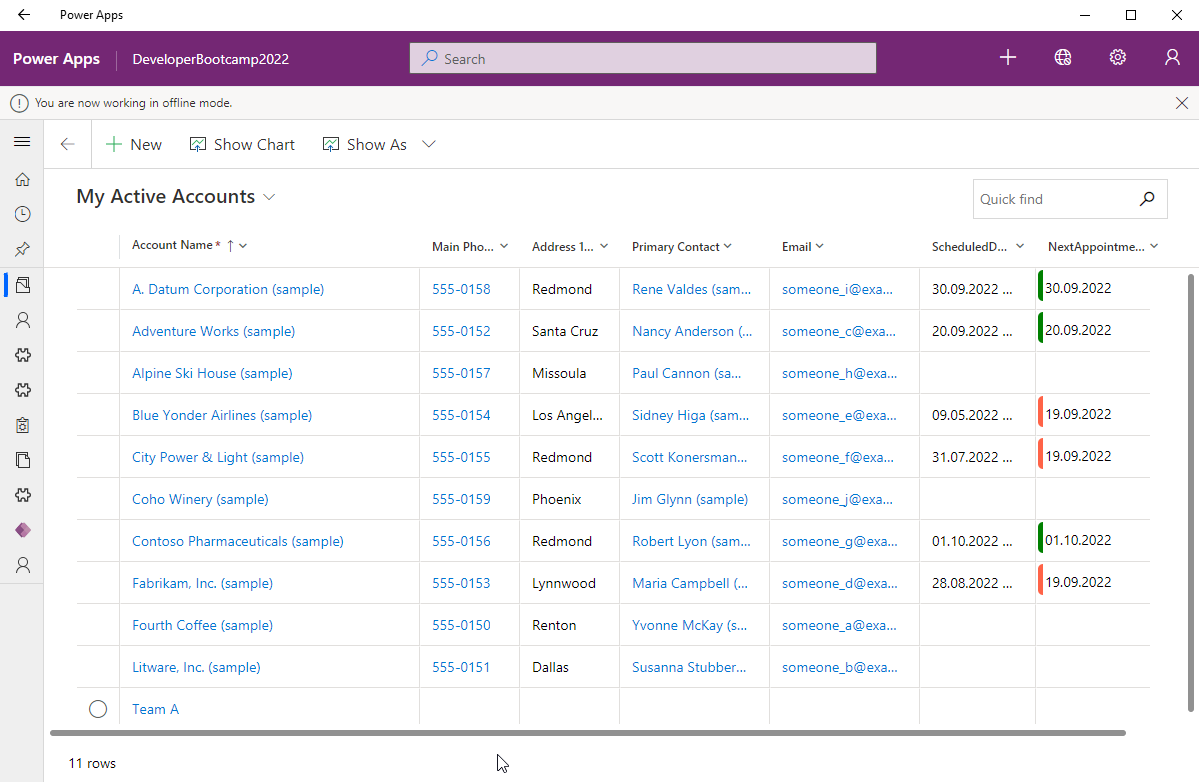
There I had a similar problem: the calculated “Next Appointment” was calculated based on “Scheduled Appointment” but it got refreshed only after I’ve clicked on another row. The fix works similar: creating own events, so I can force the refreshing right away. I’ve implemented this one too; you can find the code in my github repository: https://github.com/brasov2de/GridCustomizerControl/tree/main/CalculatedColumn_ForceRefresh
And here is the result:
Hope it helps!
Photo by The Lazy Artist Gallery: https://www.pexels.com/photo/woman-holding-remote-of-drone-1170064/

Thanks Diana. Very user friendly instructions!
Your posts are just incredible. Thank you so much for continuing to share your knowledge with the world!
Thank you so much for the nice words ! 😊🤩 Made my day !
Hi Diana, thank you for all of these posts, they are extremely helpful! I have a question about how I can control where the editable grid control is displayed within my environment. For example am I able to only have it displayed within a single model driven app instead of all of them, or can I control showing it for one specific view in the system?
Hi Ross,
You can define a dataset PCF (so also the Power Apps Grid) for a specific table (all views) or specific view or a subgrid.
But the definition on table or view level is possible only with the classic designer (as far as I know).
Does this answers your question?
Hello Diana, I really appreciate you for the efforts on these posts, and I’ve been able to learn a lot from them.
I have a question, so currently I’m using a PCF Grid customizer to customize a view. This view shows a list of tasks and is linked to a dataverse table called tasks. I also have a column in this view which contains a button, and when I click on the button it updates the tasks table, and changes the status of the task to ‘completed’. Now the changes aren’t reflected on the view, as it needs to be refreshed. So I was wondering if there is a way to perform the refresh from within the PCF, or access the refresh button from the Command bar via code?
Thanks
Vimal
Hi Vimal,
Unfortunately we cannot control the grid from inside the PCF. But we can send messages to form-scripting/grid scripting using postMessage. Using registered JavaScript there, we can refresh the grid.
I’ve used this in the Drag&Drop rows customizer. Maybe you want to have a look: https://dianabirkelbach.wordpress.com/2023/04/29/drag-and-drop-rows-in-power-apps-grid/
Thanks Diana, for this approach. But I’m guessing that the form-scripting can be applied in the context of a form. But can the same be achievable if I just have a view on a page?
Hi Vimal,
I haven’t tried it out on views in sitemap, but we can register scripts on the grid for sitemap too (unfortunately only with the old customizing, but it works).
So you should be able to post a message to that scripts.
Hi Diana,
Thank you so much for your very useful posts !
Do you believe it is possible to dynamically hide/show grid columns of the PowerApps Grid control based on the CRM App User language setting ?
Here in Belgium, we are building a CRM which provides Client Data, INCLUDING STATIC DATA (countries, document types, insurances, etc), in 3 languages : Dutch, French and German.
These data are NOT option sets but Entity records. And therefore for each record, we store the 3 translations in the record. With a PowerApps grid control, we would return the 3 translations in 3 columns and use the cell renderer to hide/show a column based on the CRM app User language setting.
Hi Francis,
With Power Apps Grids, it’s not possible to hide columns. I don’t know if you can design the column width to be 1px.. maybe then you have the columns available for your customizer control , which you render in a common column (could be a dummy column with no data).
A much cleaner solution, would be to always use only one column (could be dummy column), and render the translated labels which you take from the other columns. You can retrieve the corresponding translated column by making your own fetches.
I’ve did something similar in these blogs:
or
Hi Diana
Thank you very much for your quick answer, and indeed your idea of a “dummy empty” column filled in conditionally by code based on the 3 language specific others is worth trying. Thank you for this !
I confirm you that, using Chrome and the old D365 customizer, you can set the width of a column to 1px, We do this regularly when we want to extend beyond 300px. How ? You open the view design, double click on the column to change column properties, click on a given width (ex: 300), then push F12 and click on “select” icon in toolbar, then select the radio button visually. This brigs you to the HTML location defining the radio button. You replace “300” by “1” in ‘ value=”300″ ‘
Thank you again for your reply !
Happy I could help, Francis! Thanks for the tip about column width on 1px.